Hebrews 4:16

Let us then come boldly unto the throne of grace, that we may obtain mercy, and find grace to help in time of need.
Showing posts with label quilts. Show all posts

Saturday, February 20, 2010

Cool Blog and fun patterns

I have to share this blog with you tonight. I found this while reading another blog and have been so blessed by the things that are shared. There is a devotion to the Lord that is refreshing and all the fun crafts are the icing on the cake for me. Today she shared this new bag pattern. I am a fool for bags! Love them. I will share some patterns for bags I have made below but I had to give first dibs to this one.
http://prairieflowerfarm.blogspot.com/
search for the Prairie Flower Book Bag Pattern

Here is another pattern I found on-line that looks easy and super cute.

http://henriettashandbags.com/paulas_slouchy_sack_pattern.html


Here is a pattern for a laptop bag.
http://www.craftandfabriclinks.com/laptop_tote/laptop_carrier_pattern.html

This little purse is made from fat quarters. :) cool!
http://sewmamasew.com/blog2/?p=737


I love to make my bags out of charm squares.

Here is a pattern that I have not made but I believe it will be my next project! :)
http://www.popularpatchwork.com/news/article.asp?a=5448

This is a link to a website who has a free pattern download for a similar bag that I have made many times. In fact, this is the bag that I have given to some of my dear friends as a gift when I have the time and the material to put one together.

The link shows a bag with 47+ charm squares for the body of the tote. The bag I have made is similar in width but I use 27 squares for the body plus 8 for the handles.
http://buttonberry.typepad.com/buttonberry/2008/03/its-a-charm-off.html


Another really neat idea is to get 2 place mats, sew(right sides together) around all the sides except the top. Turn out and sew a handle(s) on the bag, perhaps a button, snap or tie to close and voila! You have a very nice and functional, not to mention sturdy bag. I went to the thrift store and bought some belts for $1 to use for my handles. All the bags I made were larger and I wanted them to have long handles so they could be used to carry things such as books, etc.

I made one for each of my girls for Christmas. They love them and use them when the go to the library.


Here are a few links to some patterns I found for this bag:
http://scribbit.blogspot.com/2007/07/placemat-purses.html
http://www.jcarolinecreative.com/Merchant2/merchant.mvc?Store_Code=JC&Screen=TOTE


I have also made my own patterns for bags that I have seen and wanted to try to make. I start with a general size reference and shape and then go from there. Typically, the quilter in me spends a lot more time focusing on the geometrics of the pattern, but it all usually comes together nicely. I have found that if I use a strong sturdy backing for the handles that they last longer, as well as not too many pieces in the handle at stress points. This I learned from experience, as I have been repairing my own bag recently. :)

Perhaps this will put you in the mood to sew!

Blessings to you !
Friday, July 24, 2009

Baby Quilt Fun

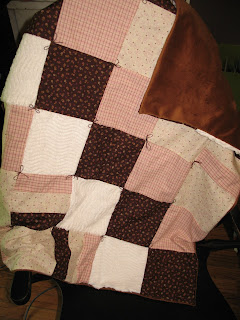
I just finished this quilt as a gift for a baby shower we will be attending on Saturday. I had a lot of fun picking out the colors and putting the quilt together for the soon-to-be mommy and baby.


There is an awesome little quilt shop that has wonderful fabrics to look through located in a town about 30 min. away. They also have tons of quilts, quilt tops and projects out for display to enable that creativity in you to take hold. Well, I remembered a quilt top that they had on display many months ago and the colors were just what I wanted. Unfortunately, after many stops at local material stores( only a little closer to me) I realized I could go no where else to get what I wanted. It isn't necessarily unfortunate, just meant a lot of running and I should have been listening to that still small voice telling me to go to the quilt store first...since I already knew they carried the color schemes I was looking for. :)


Thankfully, the material was still there and I was able to pick through to get what I wanted in a short amount of time. Since the pattern was one I had seen and then put together in my head of what I wanted it to look like we had to do a little math to decide on the ending measurements.

The store owner showed me this warm and fuzzy material I used for my backing a suggestion. My only request was that it was to be very soft.. it was for a baby. I was thinking of a flannel or soft sateen but this little furry velvet ( my feeble attempt at description) is indulgent. To quote my youngest daughter and husband... " Ohhhhh, this is so soft". I think my response was exactly like this. My daughter went on to say.. "Momma, will you make me a quilt with this?" And come to think of it, my husband did the same! ha!ha!

I knew I wanted the squares to be 6 inches so I cut 6 1/2 squares of each fabric and then for the fence rail blocks I cut 2 1/2 x 6 1/2 in. rectangles, then sewed them together to make my block .

It did not take long to sew my fence rail blocks together and then to piece the quilt as I wanted it to look. I actually drew the quilt on a piece of paper and colored it in to match the fabric.

Because of the backing and the terry cloth material (the white squares) I chose to tie the quilt with brown embroidery thread rather than quilt it. I personally like the bows vs the ties so this quilt has bows on it! I flipped the terry cloth fabric ( if you look you can see a design on it) so the design was going a different direction in each row. I did that with the fence rail blocks as well. In the first picture they are at the bottom left, it is hard to see them the way I laid the quilt for the picture but I wanted to show the back fabric. You can see the full quilt below on my table.
It turned out very nice and very soft! :) I hope the new momma will enjoy it.